Wednesday, December 31, 2014

Stampendous: "Frolic and Play, the Eskimo Way!"

It's impossible to feel the winter drearies when frolicking and playing with this Cling Snowman Friends Trio from Stampendous. Just color them up in happy colors, add plenty of frosty Multi Crystal Glitter Mix, bright and sparkly snowflakes, and a fun banner to a simplistic igloo...and you'll be Eskimo kissing in SNOW time!

Just create an igloo-shaped card from Dotted Swiss Bazzill Basics cardstock in white. Die cut an oval from the front. Add a liner inside of a wintery patterned paper. Stamp and color the trio before cutting out and adhering to the inside oval with dimensional tape, along with a glittered strip from a Drip Border punch. Adhere a hill-and-valley folded base to show off the dimension of this design.  The banner was colored to match, and stamped with the Perfectly Clear Big Top Alphabet set. The end result is a fun display for the entire winter season!

If you've missed the first two days of this week's snowy challenge, be sure to head over to the Stampendous blog for more frosty fun! You'll also find the details for the December challenge for YOU by clicking HERE.


Friday, December 26, 2014

Stampendous: Tired but Inspired

Wow! The holidays can be so exhausting...and yet, they can also be very inspiring. All the rush of emotions and feelings are also a reminder of what inspires us in whatever we do. Family. Faith. Love. Even hate can be inspiring. It's what we do with these inspirations in our lives that make a difference.

On a more simple scale, just taking the time to demonstrate kindness and empathy toward those who are suffering, mentally and/or physically, to create a gift card that says it all. Stampendous has the perfect sentiment set for just these occasions. The Perfectly Clear Sincere Sentiments set has wonderful encouraging comments for friends, family, and acquaintances. Especially, when highlighted by a soft stamping of the Perfectly Clear Lacy Ovals. Soft green is such a soothing color, so I kept my designs in shades of green...Memento New Sprout and Cottage Ivy inks, soft iridescent May Arts' ribbon, and beautiful WorldWin Treasures cardstock in Cool Mint.

I highly recommend making several of these, using the various sentiments, to have on hand. The perfect thought at the perfect time.


Check the Stampendous blog for more inspiration this week. Be sure to play along and link to the December challenge. You can find the details HERE.

Thursday, December 25, 2014

Dreamweaver: Have Yourself a Merry Quick and Cute Christmas!

Merry Christmas to everyone! Hopefully, you now have the opportunity to relax and enjoy and hurry and scurry of the past several weeks. As you know, this month the Dream Team have been all about the Quick and Cute...whether that be cards, gifts, wrapping, or tags...we've had sleigh-loads of ideas! We hope you've been able to play along by posting your creations using the Inlinkz tool on the Dream It Up! blog, for a chance to win the stencil of your choice, and a possible bonus stencil for using Dreamweaver products in your Quick and Cute project! Here's what fun I've been up to this week:

This card is completed quickly, and part of the fun is the polka-dotted paper from BoBunny, as it really gives the impression of a snowfall. I know several people who no longer mail Christmas cards before the holidays, but wait until the new year to send good wishes to friends and loved ones. This card would be perfect for this. The Dreamweaver Season of Joy stencil design is an all-in-one that with one swipe of regular embossing paste, and a sprinkle of Stampendous glitter, your focal panel is complete. Tear the edges if you desire, add a May Arts' silky bow, and you're done with a beautiful winter themed greeting.

Hope you have a wonderful holiday, and a spectacular new year!


I'd love to receive a comment from you before you head on to the rest of the "B" team:


An InLinkz Link-up

Wednesday, December 24, 2014

Stampendous: Feeling Inspired

As we head to the beginning of a new year, we tend to give more thought to change. Change in ourselves. Change in the world. What needs to be changed. How can I be a part of that change. The world can be a scary place, and various events worldwide seem to add to that frightened feeling. We want ourselves to feel safe, but more so, we want our children to feel safe.

Personally, I wish that everyone would be inspired to truly care about one another, without stereotyping, without prejudice, without judgement. So, my post today is inspired by a desire for PEACE.

This card was created using a ink resist technique. The Stampendous Dove Music Cling Stamp was inked with Versamark ink and stamped on glossy white cardstock. I used a Kaleidacolor inkpad (Tahiti) to ink a brayer, and roll the ink over the panel until I'd built up enough color to please me. I wiped a paper towel over the surface, which aided in removed any ink on top of the image, and the design comes through. I brayered the same ink over the Cling Music Score stamp, and rolled it on a panel of regular white cardstock, which transferred the design along with the ink. A stamped scroll design was added, and everything was added in layers to my card, along with a good sprinkling of Stampendous Color Fragments in Teal and Hot Lime. The cut out bird was edged with a teal marker which helps it to pop off of the background.


What are you inspired by, and for what purpose? Blessings to all...

Pam

We hope that you've been inspired to link your creations to the Stampendous challenge for December. You can find the details HERE.

Tuesday, December 23, 2014

Feeling Tangled?


Entering that last minute zone of holiday insanity? Whatever you do, "Don't get your tinsel in a tangle"! I thought I'd post this cute and amusing framed mantra for this week, featuring the Stampendous Cling Tangled Tinsel sentiment, stamped and highlighted with a bit of Stampendous purple Micro Glitter. The focal panel was matted with mirror lime, white, and black cardstock, with a larger mat of Core'dinations' textured cardstock.

The frame was one of those cheap $1 frames from Michaels which I gave one coat of black acrylic paint,
and when dry the edges were sanded a bit. I had picked up a bag of these glitter-covered styrofoam balls there as well, so I used an old serrated-blade knife to cut some in half and adhere them to the frame with Beacon Zip Dry as bright spots of color. Hope this is an extra bit of inspiration and laughter to round off the season!

Remember, the Stampendous team have been posting soothing inspirational creations for you this week. Pull up to your computer with a spiked or unspiked mug of cocoa, and enjoy the small bit of time to yourself.

Don't forget to squeeze in some time before January to post a creation for the December challenge. You can find the info HERE.

Happy holidays!

Friday, December 19, 2014

Stampendous: More Pen Patterns

It's just not the holidays without piles of sparkle, and the Stampendous Pen Pattern images are perfect for adding plenty of glitter!

The Pen Pattern Snowman was stamped with Tuxedo Black Memento ink on white cardstock, along with the Pen Pattern Waves. I used a Zig Glue Marker to adhere Stampendous Micro Glitter from the Spring Kit, in bright pink, lime, and aqua, and filled in other areas with Multi Crystal Micro Glitter...kind of like painting with glitter! The wave designs were cut in half and adhered from  both sides of the focal panel. "Joy" from the Holiday Wishes Clear Set was stamped on the card, and a bright pink pom pom was added to Snowy's hat 'cuz...you know me...love my pom poms!

Be sure to check out each day of this week's posting and links from the Stampendous blog, and play along with our challenge. You can find all the details HERE.


Thursday, December 18, 2014

Dreamweaver: Quick and Thick

In a flurry of a hurry? This month the Dream Team are all about the Quick and Cute...whether that be cards, gifts, wrapping, or tags...we have sleigh-loads of ideas! Play along by posting your creations using the Inlinkz tool on the Dream It Up! blog, for a chance to win the stencil of your choice, and a possible bonus stencil for using Dreamweaver products in your Quick and Cute project! Here's what fun I've been up to this week:

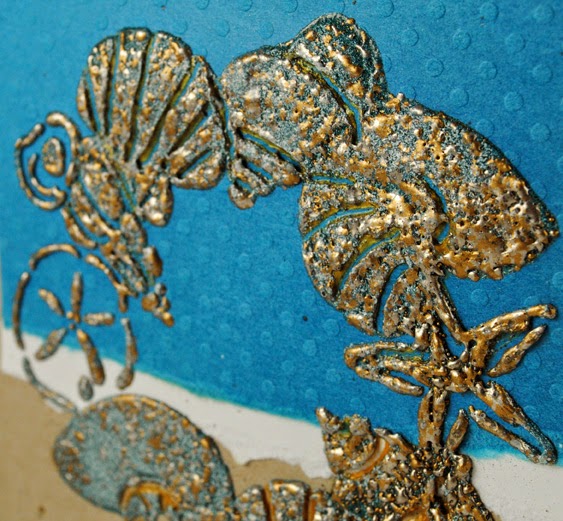
As we've finally been getting some "chillier" weather in SoCal, I thought my post today should conjure up thoughts of warm and sunny beaches, just to keep myself confused! I am so in love with the new Dreamweaver Shell Wreath...appropriate for Christmas, yes, but appropriate for those who just love the beach. I made this card for a friend who loves all things beachy, along with an ornament using the same stencil. However, I'll post the ornament another time as it is fairly simple, but very involved and, therefore, does not fall into the "Quick and Cute" category for this month. Now, you're looking at this card and thinking that this card is quite involved as well. Nope. Not really. Here's what I did...

First I created a panel from teal Dotted Swiss, plain white, and kraft cardstocks, with the teal and white edge torn to mimic the shoreline against the sand. Then I went on to paste-emboss the wreath on this panel in Metallic Gold, as well as the Mele Kalikimaka (Hawaiian for Merry Christmas) sentiment on the kraft card base. The sentiment was set aside near a small fan to dry.

Meanwhile, I poured a good portion of Stampendous Aged Teal Embossing Enamel on top of the wet paste. I used my heat tool to melt the enamel, and in the process puff up the paste as well. As a side benefit, the paste is pretty much dry now...and looks gorgeous! Chunky, metallic, and elegant, but more importantly...quick and easy. A great "conveyer belt" type of card to do in multiples, and gather in all the ooohs and aaaahs that will be coming your way.


I'd love to receive a comment from you before you head on to the rest of the "A" team:


Wednesday, December 17, 2014

Stampendous: Pen Patterns are Positively Picturesque!

This week the Stampendous team are having a joyful time playing with the Pen Pattern images! They are all so cute, as you can see HERE! One of my faves is this darling Pen Pattern Penguin. Most of the Pen Pattern images are so fun to color, but sometimes you just want to complete a card in a hurry. So, I just stamped him three times on white cardstock with Paris Dusk Memento ink. The first one was on a square panel, with rounded corners. The second one required being cut out around the head, wings, and gift, and adhered over top of the previous one with dimensional tape. The final one was just the scarf, brim, and wings, and adhered on top of the other two. White glue was brushed over the gift ribbon and the fluffy brim, and Medium Multi Crystal Glitter added for sparkle. I added a tinsel pompom as well. (Just a tip...snip a portion of the fluff off the back of the pompom to adhere flat.)

The dark blue panel was machine embossed with my Dreamweaver Christmas Borders Embossing Folder. A few messages from the Stampendous Perfectly Clear Holiday Words were stamped in the blue ink on white cardstock together, and die cut with the Dreamweaver Nesting Frames, and adhered to the card. More messages were stamped inside.


We always love when you share your creations with us, either by emailing them to Stampendous, or posting on the Stampendous Facebook page. If you'd like more info on playing with the monthly challenges, click HERE.

Head over to the Stampendous blog to see who else is playing today, and check back there again tomorrow!

Tuesday, December 16, 2014

Woodware: Thanks for Noticing

It's always a great idea to stockpile on Thank You cards, especially for after Christmas, which is just what the Woodware team have been challenged to do this week. It's especially nice to know that someone appreciates the effort and thought that goes into finding the perfect gift (even if that Neon Purple Elf Tie was not quite what your hubby had asked Santa for), and a handmade card is the best way to show it! (Remember...it's the thought that counts!)

This card is a great one to do in multiples. Here's what you'll do:

1. Cut and fold, or buy precut sets with envelopes, your card bases.
2. Cut white cardstock panels that will be framed nicely on your cards.
3. Spritz with ink mists in soft colors. Let dry.
4. Use an dye-inkpad in a dark color to apply ink over the Dreamweaver Flower Corner stencil, and place face up on the base plate of your embossing machine.
5. Place your spritzed panel on top of the stencil, face down. Run through machine to transfer ink, and emboss at the same time (also known as letterpress). The flowers will remain soft in color, and the background will be the darker ink color.
6. Place the Dreamweaver Thanks stencil on each panel, taped down with removable tape, and use a stencil brush to apply black ink.
7. Add curly-ques to each letter with a Sakura Micron pen.
8. Adhere panels to cards. Embellish with Card Candi Polka Dots.


Friday, December 12, 2014

Stampendous and Art Anthology: Sprayin' and Playin' Finale


Everyone knows that Mixed Media is the HUGE thing in the art world right now, and Stampendous has been happily mixing it up as well. For the past three days, we've also been mixing it up with Art Anthology, with their amazing line of Dimensional Paints and water-based Colorations Spray Mists. Hopefully, you've been following us December 10 - 12, leaving comments along the way, for a chance to win the awesome products featured in the banner above. For more details, check the Stampendous blog.

Here's my mixed media decor project that I created for today's post:


Mixed media is sooo much fun, a chance to build layers of color, texture, and design, and this piece was no exception.

The base is a section of canvas cloth, cut and taped down on the clipboard with removable painter's tape on all sides to prevent shrinking and warping. Gesso was brushed over the piece and allowed to dry. A torn section of an old Longfellow poem was adhered to the panel with an underbrushing of Beacon Fast Finish Decoupagé, and an over-brushing as well. When dry, the surface was spritzed with Art Anthology Colorations Mist in Timeless. While this dried, I stamped the Stampendous Winter Cottage on white  tissue paper, and colored from behind with Copic markers. Fast Finish tended to dilute the Colorations Mist, and the result was a soft yellow color which was perfect for the antique feel I was going for. Using a palette knife and the Art Anthology Cotton Velvet Dimensional Paint, I embossed the Art Anthology Stars stencil up in the right corner, and sprinkled this with Stampendous Multi Crystal Glitter. This same paint was applied over the "JOY" letters with glitter as well and set aside to dry. More of the paint was applied to the snowy hills of the cottage scene, as well as the twig and cone frame around it, with more glitter of course! I used the Brick Red Art Anthology Stone Dimensional Paint for the holly berries as it provides great dimension and texture.
The edges were torn, and the piece was decoupagéd onto the surface, adding another layer. The

Finally, the frame was a plain unfinished one from Michael's, which I'd dry brushed white Gesso over the surface. The Art Anthology Brick Stone Effects paint was painted around the inside and outside edges of the frame. The Stampendous border was stamped in  brown ink. Dreamweaver's Holly and Swirls was stenciled using a large brush and the Tsukineko Splendor pad in Antique. A bit more dry brushing over the top, and a wet brushing of Fast Finish over all provided a nice base to adhere sprinkles of Stampendous Shabby White and Aged Silver Embossing Enamels. The finish held the powders in place so that I could apply the heat tool without them blowing away. The finishing  touch was inserting the canvas in the frame, and adding a few red rhinestones as berries on the frame.


Let me know what you think of my project, before hopping to the next on the list:

(Please note: the Art Anthology team will be posting frequently throughout the days, so be sure to keep checking back for more fun inspiration!)

Don't forget...the Stampendous December blog challenge info can be found and linked to HERE

Thursday, December 11, 2014

Dreamweaver: Cute, Cute, Cute!

Here for the Stampendous/Art Anthology hop? Please scroll down, and enjoy the view as you go!

In a flurry of a hurry? This month the Dream Team are all about the Quick and Cute...whether that be cards, gifts, wrapping, or tags...we have sleigh-loads of ideas! Play along by posting your creations using the Inlinkz tool on the Dream It Up! blog, for a chance to win the stencil of your choice, and a possible bonus stencil for using Dreamweaver products in your Quick and Cute project! Here's what fun I've been up to this week:

This card is a perfect example of why it occasionally okay to leave a mess on your workspace. I've been working with copious amounts of glitter lately, some of it being rather chunky. So, after I ran my panel of Core'dinations Chalk Core cardstock through my Big Shot with the Dreamweaver Heart Ornaments stencil, there were some additions in the sanding process. Using the Core'dinations sanding tool over the embossed image revealed the stencil design in chalky white which is very cool. However, it also revealed areas where there were bits of glitter underneath. Ordinarily this would not  be something you would want, but in this case, it created the perfect snowy impression!

As far as being quick and cute, the panel takes about a minute to complete before adhering it to the Dotted Swiss card with Beacon Zip Dry, and adding a scrap of May Arts ribbon and ric rac with a quickly stamped tag from Stampendous' Holiday Words set.


I'd love to receive a comment from you before you head on to the rest of the "B" team:


An InLinkz Link-up

Wednesday, December 10, 2014

Woodware: Inching Toward Christmas

 If you are here for the Stampendous/Art Anthology post, please scroll down, but enjoy the view along the way!


The Woodware team are playing with "inchies", little one inch squares that you design with. Three of the team have already posted their versions, which you can check out on the Woodware Blog.

My version features a panel of Glossy Red Embossing Pasted white cardstock with the Dreamweaver Chevron stencil. The slight bridges between the rows (necessary in the design of the stencil) were perfectly one inch apart, so were easy to divide into the inch square segments necessary. These were adhered to a kraft cardstock card. A sentiment from the Stampendous Perfectly Clear Christmas Wishes was stamped and embossed in white. Strips of green ric rac and Card Candi in Christmas colors finished the card. Easy peasy!


Stampendous and Art Anthology: Sprayin' and Playin'


Everyone knows that Mixed Media is the HUGE thing in the art world right now, and Stampendous has been happily mixing it up as well. For the next three days, we're also mixing it up with Art Anthology, with their amazing line of Dimensional Paints and water-based Colorations Spray Mists. Follow us December 10 - 12, leaving comments along the way, for a chance to win the awesome products featured in the banner above. For more details, check the Stampendous blog.

Here's my two-for-one card that I created for today's post:

Yes, two-for-one as it is a great greeting card for Christmas, but Santa can be also used as a handmade ornament on the recipient's Christmas tree! The Stampendous Jumbo Cling Santa's List was stamped and embossed in black on white chipboard, before having his snazzy suit painted with Art Anthology Stone Effects Dimensional Paint in Brick. These paints have a matte finish, add so much texture, and almost give the impression of velvet. Art Anthology also has a line of Velvet Dimensional Paints, with texture and shimmer which would have been perfect for this as well.

As a  contrast to the red, I painted the Cotton Velvet Dimensional Paint, daubing it really, over Santa's beard and suit trim. I covered this with Stampendous Multi Medium Crystal Glitter for the great sparkle that you expect during the holidays. Once the paint dried, I colored and shaded the remaining portions, and cut him out. A hole was punched at the top to loop a bit of red tinsel cord. The card base was Core'dinations cardstock over a kraft card. The white glittery panel was stamped and embossed with one of the sentiments from the Stampendous Christmas Wishes Perfectly Clear set. I applied a few dabs of Beacon FabriTac adhesive where the tag would  be adhered,  but let it dry slightly before placing Santa on top. This allows him to be removed and used as an ornament.


Let me know what you think of my happy Santa card, before hopping to the next on the list:

Stampendous Blog

Jamie Martin

Pam Hornschu (you're here)

Art Anthology Blog

(Please note: the Art Anthology team will be posting frequently throughout the days, so be sure to keep checking back for more fun inspiration!)

Don't forget...the Stampendous December blog challenge info can be found and linked to HERE

Tuesday, December 9, 2014

Stampendous and Core'dinations: More Sandy Options!


Yes, the Stampendous team are breaking out their sanding blocks once again as they get to the Core of their creativity with wonderful Core'dinations' cardstock. Three days of awesomeness, and yes, there will be prizes. 

 
Check the Stampendous blog for all the details. Meanwhile, here's my creation for day one:

You can't be sad when Santa is involved! Especially when using the Stampendous Jumbo Cling Dear Santa. This set comes with a great border stamp and template/stencils to use as well. Santa was stamped in Cocoa Memento ink on kraft cardstock, and colored with Prismacolor Pencils. I placed the Santa mask over him, and while he was covered, I stamped the border stamp in white ink and embossed in white, as well as stenciling the chevron design stencil/template with Rhubarb Memento ink. No cutting your own mask to protect your coloring while stamping something else in the background. Love that!


As for the Core'dinations cardstock...I used the new Chalk Core on the left panel by machine-embossing it with the Dreamweaver Flourish stencil, and sanding to reveal the "chalk" design. On the right is a panel of red Core Essentials, machine embossed with the chevron border from the stamp set, and sanded to reveal the pattern. This became a bit more distressed than I was going for as the stencil in the set is quite thin, but it does work, especially if you add an extra piece of thick cardstock as a shim.

Santa was asking for some bling, so he received a healthy dose of it by using Beacon GemTac to adhere Stampendous Spoonful of Snow. This was heated as well to melt the bits of white embossing powder in this mix, giving it a nice bit of sparkle and texture at the same time.


Be sure to leave me a comment before moving on the team members that are playing today:


We'd love for you to play with our challenge for December. You can find all of the info HERE.