Welcome back to week two of our amazing collaboration between
Ranger's Tim Holtz line of Distress Powders, and our beautiful
Dreamweaver Stencils & Products! If you missed last week's event, start
HERE.
Last week, we were totally blown away by the awesome response we received from those of you who hopped over from
Tim Holtz's blog and the
Ranger blog to check us out! We've been doing the "happy dance" ever since! Hopefully, you will continue to check us out, especially over the next few weeks as we continue our play-time in
Tim's sandbox. (It is rather an appropriate metaphor considering the cool texture of his
Distress Powders.)
Apparently,
Tim and the wonderful people at
Ranger
were also excited by the response, and they've decided to "up the ante"
in the form of an additional prize package(s) which will include
TWELVE Distress Powders each, and a
handful of
Dreamweaver Stencils to go with! Wow! Just one teeny-tiny detail...to win one of these packages from their blog, you need to
create something with
Tim Holtz's Distress Powders and
Dreamweaver Stencils and attach it to the inlinkz on the
Ranger blog. Winners will be selected randomly. For more details, head over to the
Ranger blog.
Once again, this week we are offering another fall prize package as shown here. Just leave us all some love as you visit, for an opportunity to be the one random winner we select. Curious as to who won from last week? It could be
YOU! Visit the
Dream It Up! blog for the announcement of the lucky commenter.
Here is what I had created for this week:

And, oh boy, did I have fun with this one! I'd had this burlap canvas from
Canvas Corp that I'd picked up a while back at my local craft store, and decided that this was the perfect time to use it.
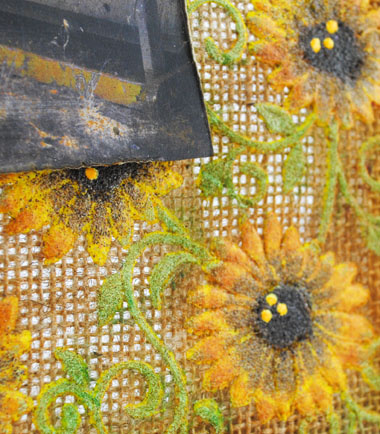
I paste-embossed the
Dreamweaver Black-Eyed Susan with
Matte Yellow Paste onto the burlap, which was easier than I thought it would be as the matte pastes are thicker and less likely to ooze through. I placed an acrylic stamping block behind the frame for a more solid surface to work with.
While the paste was wet, I carefully sprinkled the various colors of the
Tim Holtz Distress Powders in the appropriate locations. (Tip: cut the end of a drinking straw at a diagonal to work as a scoop for more precise placement.) I used
Walnut Stain for the centers,
Brushed Corduroy for shading, and
Old Paper for the vines and leaves. I applied my heat tool to melt the
Distress Powders, and to dry the paste more quickly. The paste tends to bubble up, but will settle down again. Be careful with the heat tool, as the burlap will burn a bit...not catch on fire, just get brown...which I liked the look of, so I continued to do it deliberately.

I also placed the
Dreamweaver Hexagons stencil over the burlap, and sprayed
Adirondack Color Wash in Butterscotch to add to the aged feel. My
May Arts mesh bow was also spritzed. I wanted to add a photo to this, which was probably the hardest part of the project! Lol. I did find this pic that I had photographed at Lynell's parents' house, so I played with Photoshop to change the color, printed it, distressed it, and spritzed more Butterscotch through the Hexagons stencil again. The hexagon shape came into play with the punched and stenciled "
relax". An ordinary wood clothes pin was distressed and brushed with
Adirondack Acrylic Dauber in Lettuce, with an old button to finish it up.
Aren't you excited to see what's next? Check out the
Dream Team players for today:
You already know where to find
Ranger's/Tim Holtz' products, but if you are having difficulty finding
Dreamweaver, encourage your local stamp/paper-craft store to carry the line of fabulous stencil designs, pastes, and other products to mix with all of your stash of
Tim's crafty goodness. You can also purchase our products on-line at
Stencil with Style.
We'd love to see you come back regularly and play along with our monthly challenges (and more opportunities to win stencils) by linking your creations to the mr. linky on the
Dream It Up! blog, or emailing pics of your creations to
lynell@dreamweaverstencils.com. Since you're on the computer already, head on over and like us on
Facebook as well. Just another location for dreamy and distressed inspiration!